
Iron-on patches are a fun and easy way to customize your clothes—but what about when it’s time to take them off? Whether you’re reusing a favorite jacket, fixing a patch gone crooked, or just refreshing your style, knowing how to remove iron-on patches properly can save your clothes (and your sanity).
Here are three proven methods I’ve personally used or seen work well, depending on the material and how the patch was originally applied. Let’s walk through them.

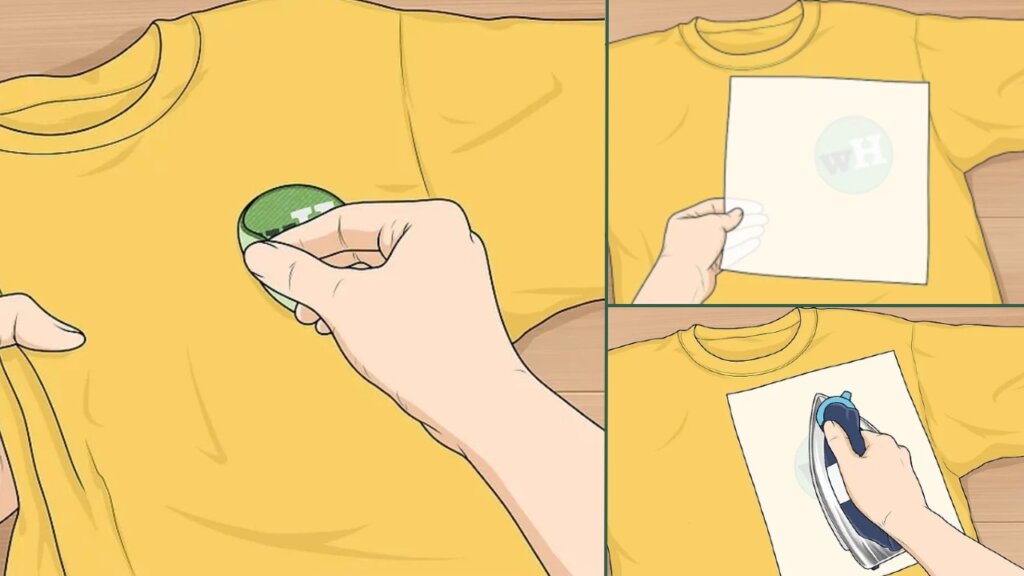
Method 1: Hot Cloth Peel (Best for Cotton, Denim, and Other Durable Fabrics)
This is the method I default to for most everyday fabrics like jeans, jackets, and bags. It’s all about softening the adhesive with heat—without melting your garment.
What You’ll Need:
- An iron (dry setting, no steam)
- A dishcloth or pressing cloth
- A small bowl of water
- Tweezers or a dull butter knife
Steps:
- Lay the item flat with the patch facing up.
- Lightly dampen the patch and the fabric surrounding it. Don’t soak it—just enough to help the heat penetrate.
- Place your dishcloth over the patch.
- Press a hot iron (on high heat, no steam) onto the cloth for about 15 seconds.
- Carefully lift one corner of the patch with tweezers. If it doesn’t budge, repeat the heating step.
This works well for synthetic-backed patches or glue that melts at medium heat. You might still see some residue—don’t worry, we’ll tackle that below.
Method 2: Gentle Removal for Leather and Suede
Removing patches from leather or suede takes finesse. High heat or harsh chemicals can leave permanent stains or discoloration. Instead, use a gradual, surface-safe approach.
What You’ll Need:
- A suede or leather cleaner (not a general-purpose solvent)
- Cotton swabs or a microfiber cloth
- A dull butter knife (optional)
Steps:
- Gently try to lift the edge of the patch with your fingers or a dull tool—no force!
- If the glue holds, apply a small amount of suede cleaner around the patch’s edge and wait 30–60 seconds.
- Try lifting again. If it resists, repeat step 2 and gently work your way in from all sides.
- Once removed, buff the area with a clean cloth and apply a leather conditioner to restore texture.
Important: Avoid rubbing alcohol or acetone on suede—they can discolor or dry out the surface.
Method 3: Careful Stitch Removal (For Sewn or Reinforced Patches)
Sometimes what looks like an iron-on patch is actually stitched down—or has a stabilizing layer underneath. Tugging on these can distort your fabric.
What You’ll Need:
- A seam ripper or small embroidery scissors
- Thimble (to protect your fingers)
- Pliers (optional, for tough fabrics like leather)
Steps:
- Turn the garment inside out and inspect the stitching.
- Use a seam ripper to carefully snip a few stitches, then peel back slowly from the front.
- If you hit resistance, check for hidden threads or backing material.
- For tougher spots, a thimble and pliers can help push or pull without hurting your hands.
Pro Tip: Don’t try to rip off the glue residue immediately—it may be a stabilizer layer that’s meant to stay or can be removed more easily after soaking.
⚠️ Don’t soak the fabric—it could discolor or weaken delicate fibers.
Dealing with Leftover Adhesive (Glue & Residue Cleanup)
Sometimes a patch comes off cleanly. Other times? You’re left with a sticky mess.
What You’ll Need:
- Cotton pads
- Rubbing alcohol, white vinegar, or acetone (for sturdy fabrics only)
- Mild detergent and warm water
Steps:
- Dampen a cotton pad with your chosen solvent.
- Gently blot (don’t rub) the sticky area.
- Let it sit for 30–60 seconds.
- Wipe with a clean cloth and repeat as needed.
- Wash the item to remove any remaining residue or smell.
Caution: Never use alcohol or acetone on suede or delicate silk. Stick to leather-safe or fabric-safe products.

Ready to Replace Those Old Patches?
Once you’ve cleared the canvas, it’s the perfect chance to start fresh. If you’re looking for custom patches that won’t give you a headache to remove later, we’d be happy to help. At Factorypin, we create high-quality patches that look great and play nice with your fabrics.
No pressure—just reach out when you’re ready.
