 Skip to content
Designing an enamel pin for your brand is very different from creating a pin just for fun.
Brand owners, merch creators, and Kickstarter founders often run into the same problems: designs that look perfect on screen but fail in production, unexpected cost increases, or colors that don’t match the brand after plating.
The truth is, designing an enamel pin for commercial use is part creativity, part manufacturing strategy. This guide is written from a factory perspective, based on years of hands-on production experience. It focuses on what brand owners actually need to know—how to turn an idea into a pin that looks right, costs what you expect, and can be reordered consistently as your brand grows.
Start with a Concept & Design It for Production
Every good pin starts with an idea that means something to you — and ideally, something your audience connects with as well.
For brands, this usually means designs that reinforce identity, values, or a specific campaign, rather than one-off visuals.
One common mistake we see: sending us a beautiful digital design with hairline strokes. On screen, they look fine—but in production, any line under 0.3mm disappears
. UV printing might be a better fit—especially for brand designs that rely on illustration-style details or tight production budgets.
Not sure how to create the design file? Whether you’re a professional artist or someone who can’t draw a stick figure, we’ve got you covered.
👉 [Check out our detailed guide here]: How to Design Enamel Pins (Even If You Can’t Draw)

Pick a Pin Size — Then Visualize It
In our experience, pins under 1” often get lost on a jacket or bag.
Collectors—and brand customers buying wearable merch—tend to prefer 1.25–1.5”Oversized pins (2”+) are popular as limited editions or event exclusives but cost more to ship due to their weight. Size matters — not just for cost, but for how your pin represents your brand in real-world use.
A 1” pin and a 1.5” pin can feel very different in hand. Instead of guessing, try printing your design at different sizes and cutting them out to see how they feel on clothing, bags, or boards.
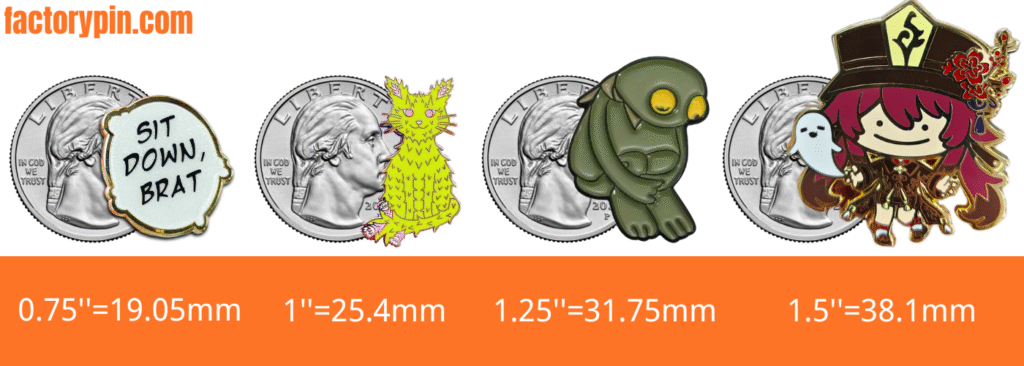
Print your design at 1 inch, 1.25 inches, and 1.5 inches. See how it looks in each size. Does it still look clear at 1 inch? If not, you may need to simplify the design.
Keep Costs Under Control (Without Sacrificing Quality)
Why this step matters:
If production costs get out of hand, your project could lose money. But there are ways to keep costs low while still creating a high-quality product.
6 Smart Ways to Cut Costs Without Cutting Quality
- Color & Quantity: More colors increase costs, while larger orders reduce the unit price. Keep this balance in mind when planning your design and budget.
- Look for promotions: Factorypin often runs “no mold fee” promotions, saving you around $50-$100 in upfront costs.
- Material & Effects: The finish and special effects you choose will determine your pricing and overall product quality. If your design is intricate but you’re on a budget, consider UV printing as it allows for detailed designs with cost-effective results. For designs that require a high-gloss metal finish, consider working with a factory that uses real gold and silver plating. Many factories offer gold plating, but it’s often a gold-tone plating, which can look overly yellow and fake. On the other hand, genuine gold plating offers a more refined and authentic look. For brands, this difference matters—not just visually, but in how customers perceive product value and pricing justification.
- Plating & Metal Choices: Pay close attention to the finish, as nickel plating is commonly used in silver-plated pins, but it may not give the same luxurious feel as genuine silver plating. In some cases, the color difference between nickel and silver is almost indistinguishable to the eye, but the price difference will speak volumes in terms of quality.
- Cost Balancing: If your pins are selling well, many factories will retain molds for 2-3 years, which is especially important for brands planning repeat launches or seasonal restocks.
Pro Tip:
Soft enamel pins are usually cheaper than hard enamel pins. If your design has lots of raised details, soft enamel might be the smarter choice.
Why this step matters:
If production costs get out of hand, your project could lose money. But there are ways to keep costs low while still creating a high-quality product.
Here, we’ve put together a breakdown of common pricing scenarios to help you plan.
| Pin Type | 100 pcs | 250 pcs | 500 pcs | 1000 pcs | 2500 pcs |
|---|---|---|---|---|---|
| Soft Enamel Pin | $2.10 | $1.85 | $1.50 | $1.30 | $1.00 |
| Hard Enamel Pin | $2.40 | $2.05 | $1.70 | $1.50 | $1.25 |
| Die-Struck Pin | $2.60 | $2.25 | $1.90 | $1.65 | $1.45 |
| 3D Cast Pin | $2.95 | $2.55 | $2.10 | $1.85 | $1.60 |
💡 Additional Cost Notes
| Add-on Option | Estimated Additional Cost |
|---|---|
| Extra enamel colors (5+) | +$0.10–$0.20 per color per pin |
| Silkscreen printing | +$13–$15 total (per color) |
| UV printing (full color) | +$10–$15 total |
| Glow-in-the-dark enamel | +$0.25–$0.50 per pin |
| Glitter enamel | +$0.30–$0.55 per pin |
📌 Note: These are reference prices only. Final quotes depend on your actual design, size, plating, and quantity. Bulk orders and seasonal discounts may reduce your total cost.
Choose the Right Backing for the Right Purpose
Pin backings aren’t just a technical detail—they affect customer comfort, perceived quality, and brand professionalism. Rather than picking based on cost, match the backing to how the pin will be used:
| Usage | Recommended Backing |
|---|---|
| Everyday wear | Rubber clutch / Magnetic |
| Selling in sets | Butterfly / Deluxe clutch |
| Larger or heavier pins | Safety pin / Locking pin back |
| Fancy or collector pins | Deluxe clutch / Magnetic |
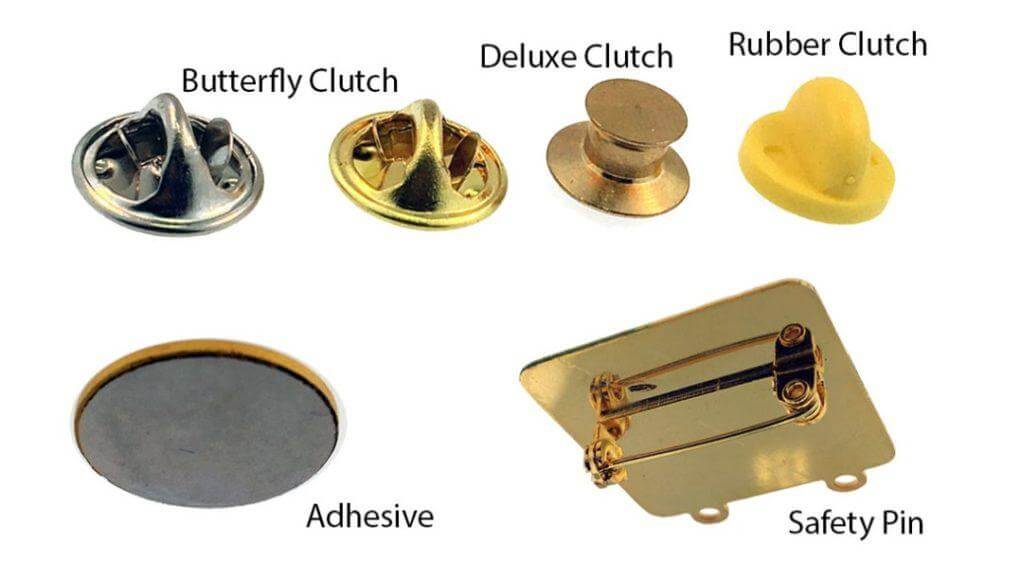
You can even match the clutch color to your pin design for a polished final look. A small touch, but it makes a difference.
What Makes a Good Factory?
Once you’ve got your design ready, choosing the right production partner is key. Let’s not focus on how to avoid bad ones — instead, here’s what good enamel pin factories usually do:
- Save your mold for 2–3 years so you don’t pay again for reorders
- Break the payment into two parts: proof fee and production fee
- Offer optional samples so you can check the quality beforehand
- Keep quality consistent from sample to full production
- Provide various plating options like gold, silver, black nickel, rose gold
Bonus tip: if the price seems too low, ask questions. Some factories cut corners by using thinner metal or fake plating — looks fine at first, but wears out fast, which can damage long-term brand trust. A good factory will be upfront about what materials they use and what your options are.
And about color shift — honestly, if your design files are correct and clearly labeled, and the factory knows what they’re doing, it’s rarely a problem. A decent factory will also take responsibility and remake the product if they mess it up.
Pin manufacturing is one of those “you get what you pay for” things. Sure, there are budget options out there — but if it’s suspiciously cheap, there’s probably a reason.
Ready to Bring Your Pin Design to Life? Here’s Your Next Step!
If you’ve followed this guide, you’re already ahead of 90% of first-time pin designers. From crafting a winning concept to ensuring production perfection, you’ve got the tools you need to succeed.
But you don’t have to do it alone. Factorypin is here to help. Our team has helped artists, brands, and Kickstarter creators bring their designs to life.
👉 Get a free design review from Factorypin today and turn your dream pin into reality.

